Tuesday, December 31, 2013

Gingerbread House Selected!


Thank you for voting on the Gingerbread Houses! This was not necessarily a beauty contest, this was a voting process purely for fun to pick a house and offer the discount associated with that house, and I hope you had as much fun as we did!

Each of these houses was carefully crafted by a member of the studio at www.anniehowes.com. Houses 1 and 2 were decorated by Ryan and Sophie, respectively. House 3 was decorated by Bridget, my daughter, and house 4 was decorated by Katy's girls. Each house was a joy to see, and I think despite some groans, each was fun to decorate.

With one exception, the houses were identical, and the rules were loose: use whatever found objects to decorate. Everyone stuck to the  contents of the box, except Kay's girls who included a Santa figure and coconut flakes, which were creative touches.

There was one boxed Gingerbread house that was slightly different from the others. One corner of the box was a bit damaged, and worried there might be a disaster inside. I reserved that kit to decorate myself. Bridget offered to decorate it for me, and because the deadline was fast approaching and I was swamped, I was relieved to have her help.

As suspected, there was some pretty serious damage. Upon opening the box, we learned each wall and both roof panels of the house were broken in at least one place. This could have been a disaster, but instead it led to the creative diagonal line along the walls on the house which may or may not have influenced your vote.

And I learned something through this about how we can start with something that's imperfect and turn it into something we can be proud of. It's not how it looks when we begin a project, it's how it looks when we finished it. It's not what we are given, it's what we make of it. This Gingerbread house could have been picked last in gym, but you voted it #1!

If you're a VIP Club member, then you've already received your discount code. Check your email =)

And, did I say thank you?

xo,
Annie

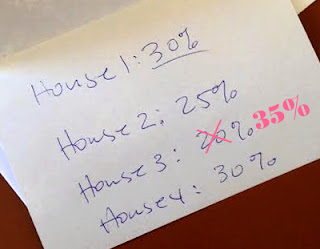
P.S. Here's the discount sheet that was sealed inside an envelope...just so you know, at the last moment, I increased the discount to 35%! Please check your email for your discount code!

www.anniehowes.com


Monday, December 23, 2013

Gingerbread Houses! What's Behind Door Number...?

 Vote!

It's kind of a tradition for my daughter and I to decorate a gingerbread house each year. This year, everyone in the studio at www.anniehowes.com decorated a gingerbread house, too. I thought it would be fun and help us all get into the spirit of the holidays and Katy, Ryan, and Sophie each decorated a house, and it's been so much fun for all of us to share our creations.

To make it more interesting, I've assigned discounts to the 4 houses, all of which will be the New Year's Day Sale available to all of our VIP Club Members. The first 100 replies will help determine which gingerbread house discount code will be used. If you're not one of the first 100 to vote, don't worry, you will still get to use the discount code if you are a VIP Member.

So, which gingerbread house do you choose? Here's the link to cast your vote.  You'll receive the discount code through the VIP Club email before New Year's Day.

Have fun voting! And happy holidays!

xo,
Annie

P.S. Here's the sealed envelope with all the codes!


Saturday, November 16, 2013

Easy! How to Add A Charm to A Bangle Bracelet.


You can easily make bracelets like the one shown above in just a few moments. If you've never made jewelry before and you're ready to get started with something easy, then this is the just what you need to start making beautiful jewelry. 

Let me first point out that these pliers in the photos are a bit large. It's what I had on hand when we took the photos. By no means do you need pliers this heavy-duty unless you're working on heavy gauge stainless steel.

Start by taking one set of pliers and grasping the jump ring on one side of the ring just below the opening. The opening should be at the top evenly spaced between the pliers.

To open the jump ring, hold one end firmly in place and rotate the other end, either away from you or towards you. Do not pull the ends away from each other. Only rotate far enough from the other end to be able to slip the charm and the bracelet through the opening. 


 Now you're ready to add the charm to the jump ring. Hold onto the jump ring with one of the pliers, and add your charm.


 Next, slip the bangle, bracelet, earring bail onto the jump ring and rotate the ends together.


Your jewelry is now ready to wear! Wasn't that easy?


I hope you've found this tutorial helpful. For more great tutorials, please visit www.anniehowes.com

xo,
Annie


Tuesday, November 5, 2013

Easy to Make Bottle Cap Christmas Ornaments.


I've been thinking this week about getting a jump-start on making holiday ornaments and crafts (I know, November is not exactly a jump-start), and I've been staring at these bottle caps that I just put on sale. What I came up with is a super easy, inexpensive and fun project with a Christmas theme.

There are so many different images you can use to make these ornaments, and you don't have to search far because I have these images available in Adobe PDF format on my website. You can also make and print your own onto smooth white card stock.

Here's what you need to make these:
And here's how you make them.

Punch a hole in the bottom of two of the bottle caps and assemble them into a string of three bottle caps. The bottom bottle cap shouldn't have a hole in it (unlike my Santa, which is my own goof).


Next, punch out the 3 images and, one at a time, peel and stick a Glamour Dot (the 3-dimensional epoxy sticker) onto the face of one of the circles. Turn upside down on a clean and smooth surface (like a clean piece of card stock) and rub the backside of the paper to remove the air pockets. Check the other side and keep rubbing until you've got them out. Rub the edges really well, too.

Then, once you have done that to all 3 pieces, take one of the Glamour Stickies and remove one of the non-stick backings from it and carefully place it on the back of the paper then press firmly. Remove the other protective backing. Carefully line the image up with the direction you want the image to face (ie. Santa's head is on straight) and press firmly into the bottle cap. Repeat with the remaining pieces. 

You are finished! Unless you want to get super crafty and add ribbon, or other things to it. Let your imagination roll! 


All supplies are available from Annie Howes.
For more fun tutorials, please visit www.anniehowes.com


Thursday, October 24, 2013

Making Photo Jewelry: Is the Glaze You're Using Causing Your Images to Turn Blue?


Have you ever made the most beautiful batch of glass photo pendants in trays only to discover a day later that some of them have turned all kinds of blotchy? If you're like me, I've also experienced this and it can be very frustrating. Over the past few years, I've determined what has caused it and how to prevent it. The good news is, it's easy and affordable and blotchy papers are avoidable.

In the past, the solutions meant we would first coat our pendant trays, typically the vintage plated pieces, with a clear varnish. That's an extra step and extra product, and we all know that means extra money. That's outdated and old school.

First, let me explain why the pendant trays turn colors. The vintage gold and vintage copper pendant trays are plated with real metals that are reacting to (most likely) the water in the water based glazes. Moisture and oxidation cause copper to turn green-ish blue and it's the oxidation that makes copper such a beautiful material to work with in architecture. But lets be honest, we're not wanting the beautiful effect of oxidation on our papers. It's just not...beautiful. The vintage gold pendant trays are actually plated with bronze, and bronze also changes colors as it oxidizes. To use water based glazes on these pieces is where the problem is occurring.

So if water based glazes cause the papers to turn blue and green, then what should you use? The answer is to use a product that isn't water based.

There are two easy-to-use affordable options that will not turn your pendant trays and papers funny blue-ish, green-ish colors.


Option 1: Glamour Seal is a liquid adhesive and sealant that is used to glue the paper to the glass, and to glue the glass into the pendant tray. One product does it all and costs the same as a bottle of water based glaze. It's just as easy to use and equally as affordable as the water based glaze you may already be using. Another added benefit? You can use this adhesive to make photo jewelry with inkjet prints! Can your glaze do that?


Option 2: Glamour Stickies is a relatively new product (Spring of 2013) that has quickly grown in popularity. This dry adhesive is incredibly strong and contains no water. It's also archival, meaning it's pH neutral and contains no acid to yellow your papers. Peel and stick and press into place. Glamour Stickies also work well to attach paper to just about anything, including your scrapbooks!

Friday, August 9, 2013

Road Trip: The Murals at Chloride, AZ


On a recent road trip returning from Las Vegas, NV we took a few minutes to explore the one-time silver mining town of Chloride, AZ in Mohave County. Located off HWY 93, it's located between somewhere and nowhere (ie. I have no clue what mile marker) in the middle of the desert.

It was Sunday, and the town was quiet. We drove past the open old-timey convenience store with tables on the sidewalk, and followed the signs that read, "MURALS". The unpaved road got bumpier the further we drove and eventually it ended at a few boulders that were, in fact, freshly painted with interesting, and unusual murals.


There was also a nice but rocky trail that led up a hill, and another that led down through the brush. If you do plan to stock at Chloride, be sure to bring sturdy shoes for the trails. You don't want to *ahem* twist your ankle *cough cough* on any loose rocks while wearing completely inappropriate shoes.
 
If you're road tripping and your legs need stretching, and your body is feeling particularly parched, it's an oasis you might want to check out. There are also plenty of antique shops and a few artist studios located in this rustic old mining town.
 

Saturday, July 13, 2013

MagnetaBelles (tm) Magnetic Pendants!

 
I'm really excited to offer these beautiful silver plated magnetic pendants made to fit the 1" Glamour FX glass shapes. MagnetaBellesTM are versatile and so easy to use. The pendant base has a strong neodymium magnet that keeps the tray insert firmly in place. To remove the insert, simply flip the tray out with your finger.
 
If you're a jewelry artist who works with glass, epoxy resin, epoxy clay, or polymer clay, this product is a great way to add variety and interest to your collection.
 
The 1" square tray inserts are also sold separately, which means you have access to an infinite variety to make one pendant the most versatile piece of jewelry in your collection.
 
Here's a diagram showing how easy it is to make jewelry using MagnetaBellesTM. Click the photo to enlarge it. If using Glamour FX Glass, make the glass pendants using whichever method you prefer. If you need a tutorial, I have one available on my website. If using Glamour FX Glass, you will need to refer to the Glass Pendant Tray tutorial which will explain how to glue the glass to the paper, and then into the tray insert.
 
 
Where to Buy MagnetaBelles.
 
MagnetaBellesTM are currently available through AnnieHowes on Etsy and will be added to anniehowes.com, soon.

If you are a retailer and are interested in offering MagnetaBellesTM to your customers, please contact me for wholesale pricing.
 
MagnetaBellesTM Giveaway Details


One lucky reader will win a MagnetaBellesTM silver plated pendant with 2 tray inserts, 2 Glamour FX Glass shapes, 1 small bottle of Glamour Seal, 1 silver plated link chain, and 2 Glamour Stickies squares.

How to Enter
(This contest is now closed.)

1) Like us on Facebook
2) Leave a comment below letting us know what you would make with MagnetaBellesTM
3) Share this contest on your Facebook page to double your entry, then send an email letting us know.

*Contest ends on July 22, 2013 at 5:00 PM PST.
 

CONTEST WINNER!
Congratulations to Emilie R!


Tuesday, February 5, 2013

New Glamour Seal Ink Jet Glaze for Glass Pendants Won't Smear Your Ink Jet Prints


Once upon a time, there was no glaze available to make these beautiful glass pendants with ink jet prints, but now there is! Introducing Glamour Seal for Ink Jet Prints. Glamour Seal, a glaze developed to use with ink jet prints that allows you the freedom to use your ink jet prints under glass without the worry of your images becoming blurry. Additionally, Glamour Seal dries in a fraction of the time compared to other top selling glazes.
 
Below are a couple of examples that took only minutes to create. Both were printed on Epson Presentation Matte Paper using Canon ink jet printer. For best results, I recommend using matte photo paper instead of glossy photo papers. The glossy photo papers are plasticky and take much longer to dry, whereas the matte papers dried within minutes, and I experienced no "silvery spots" (trapped air) with matte papers. 


Flora image from www.Piddix.com

Butterfly image from www.Piddix.com

If you're using Luxe Resin and need a sealant for your ink jet prints, Glamour Seal glaze is an ideal solution. Simply brush on Glamour Seal and allow it to dry, then apply Luxe Resin for beautiful results.

Glamour Seal in 4 oz bottles (with the Purple Label)

Glamour Seal glaze for Ink Jet Prints is easy to use, affordable, and gives beautiful results!

Here's how to make a
Glass Pendant in a Pendant Tray

HOW TO MAKE A GLASS PENDANT:

STEP 1: Find or create paper image print with ink jet printer or color laser printer. (Examples are from an ink jet printer on matte paper). I recommend matte paper because it allows the Glamour Seal to dry super fast.

STEP 2: Use Glamour Seal to glue the paper to the Glamour FX glass, allow to dry. This takes only a few minutes. No more long waits!
STEP 3: Trim the paper around the glass.

STEP 4: Coat the back of paper with Glamour Seal and press into pendant tray.

 
* Note: Glamour Seal is not a 3-dimensional glaze, however it can be used to protect your ink jet images when using Glamour Glaze or Luxe Resin.